Prerequisites
- Basic understanding of blockchain, EVM, and DID concepts.
- Using the Remix IDE with MetaMask configured to interact with a peaq network.
- You have token funds available in the wallet connected to the a peaq network.
Instructions
1. Setup Remix IDE
- Open the Remix website.
- Create a new blank workspace for the precompiles.
2. Create a New File
- In your Remix workspace, create a new file named
DID.sol. - Copy the content of the DID precompile file from the peaq network node precompile page and paste it into the
DID.solfile. The precompile is found at the peaq node source code.
3. Compile the Contract
- Compile the
DID.solfile by clicking on the Solidity Compiler tab and selecting the appropriate compiler version. - Ensure the compilation is successful and generates the ABI file needed for interacting with the smart contract.
4. Deploy and Interact with the Contract
- Under the Deploy and Run Transactions tab, select Injected Provider - MetaMask as the environment.
- Ensure your chain ID matches the selected network (peaq/agung).
- Choose the account with sufficient token funds.
- Set the contract address to
0x0000000000000000000000000000000000000800(found at the top of the copied file). - Click At Address to load the deployed contract into the interface.
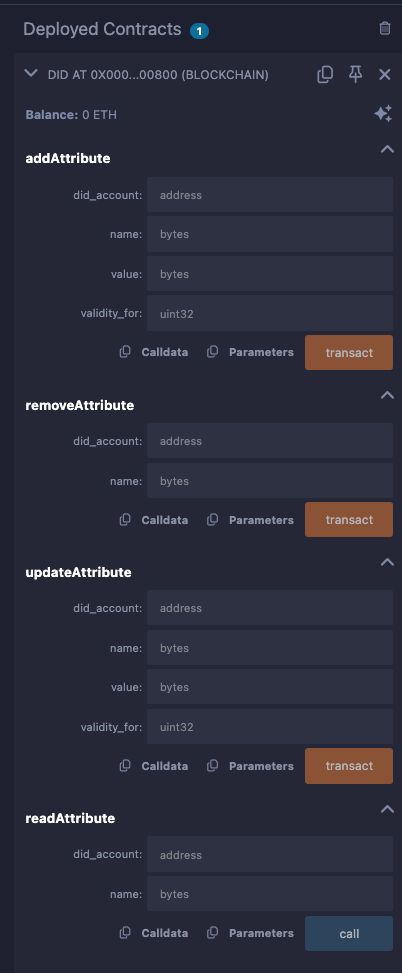
5. Interact with the Functions
addAttribute
To add a DID Document as a value please generate the value via the Serialized DID section in the JavaScript SDK Reference. Otherwise you can set your own custom data to set with.- Parameters:
did_account: Public hex key (e.g.,0x…).name: Hex representation of the DID name data.value: Hex representation of the DID value data.validity_for: Set to 0.
- Behavior: Adds a new attribute to the DID.
- Result:
- Verify the transaction in MetaMask or Remix.
- Confirm EVM logs in the Remix terminal.
- Check for the attribute on the Substrate side via recent events in polkadot.js.
removeAttribute
- Parameters:
did_account: Public hex key (e.g.,0x…).name: Hex representation of the DID name data to be removed.
- Behavior: Removes an existing attribute from the DID.
- Result:
- Verify the transaction in MetaMask or Remix.
- Confirm EVM logs in the Remix terminal.
- Ensure the attribute is removed on the Substrate side.
updateAttribute
- Parameters:
did_account: Public hex key (e.g.,0x…).name: Hex representation of the DID name data to be updated.value: Hex representation of the new DID value data.validity_for: Set to 0.
- Behavior: Updates an existing attribute of the DID.
- Result:
- Verify the transaction in MetaMask or Remix.
- Confirm EVM logs in the Remix terminal.
- Ensure the attribute is updated on the Substrate side.
readAttribute
- Parameters:
did_account: Public hex key (e.g.,0x…).name: Hex representation of the DID name data to be read.
- Behavior: Reads the value of an existing DID attribute.
- Result:
- Confirm the attribute information in the
readAttributefield. - Data is displayed as a tuple (e.g.,
tuple: xxxx).
- Confirm the attribute information in the
For more exhaustive definitions please look at the DID Operations in the SDK.