Now that you’ve successfully created a machine ID, stored signed data, and linked everything to a DID Document, the final step is to verify that everything is functioning as expected.
In this section, you will learn how to:
- Retrieve and inspect a machine’s DID Document.
- Confirm that the linked signature and data storage are correct.
- Verify that the signed message was indeed created by the machine and approved by the administrator.
- Explore and confirm relevant transactions on a block explorer.
These steps are essential to ensure the integrity of your machine’s on-chain identity and data, and to build confidence in the end-to-end trust model of the peaq network.
Prerequisites
Before proceeding, ensure that you have:
- Completed the Onboard a Machine section.
- Completed the Store Machine Data section.
- A basic understanding of public/private key cryptography and ECDSA signature verification.
- Familiarity with using blockchain explorers to inspect transactions and on-chain data.
Code Examples
Resolve DID Document
Now that the machine has created and registered a DID Document, we can query it from the blockchain to verify its contents. In this step, we’ll use the same machine wallet to resolve the DID and read its document structure.
The code below:
- Instantiates the
peaq-js-sdk.
- Reads the DID Document associated with the machine wallet’s address.
- Logs the full DID Document to the console, which includes verification methods, services, and the signature metadata.
import { Wallet } from "ethers";
import { Sdk } from "@peaq-network/sdk";

// Reuse the ECDSAKeyring class from previous page
class ECDSAKeyring {
    constructor(privateKey) {
      if (privateKey) {
        this.wallet = new Wallet(privateKey);
      } else {
        this.wallet = Wallet.createRandom(); // generates new key
      }
    }
    getAddress() {
      return this.wallet.address;
    }
    getPrivateKey() {
      return this.wallet.privateKey;
    }
    async signMessage(message) {
      return this.wallet.signMessage(message);
    }
}

async function readDID(machineWallet){
  const HTTPS_BASE_URL = "https://peaq-agung.api.onfinality.io/public"; // Agung testnet endpoint
  const WSS_BASE_URL = "wss://wss-async.agung.peaq.network";        // Used to read previously stored DID

  const name = "project_name"; // Same name as before

  const sdk = await Sdk.createInstance({
      baseUrl: HTTPS_BASE_URL,
      chainType: Sdk.ChainType.EVM
  });

  const document = await sdk.did.read({
    name: name,
    address: machineWallet.getAddress(),
    wssBaseUrl: WSS_BASE_URL
  });

  console.log(document.document);
}

async function main(){
	// Get the previously created wallet via the private key
    const machineWallet = new ECDSAKeyring(MACHINE_PRIVATE);

    // Same data value that was stored previously
    await readDID(machineWallet);
}

main();
Return Object
{
  id: 'did:peaq:0x1f7701CbdadDB1775C525Ca6FcF18ec4135D228B',
  controller: 'did:peaq:0x1f7701CbdadDB1775C525Ca6FcF18ec4135D228B',
  verificationMethods: [
    {
      id: 'did:peaq:0x1f7701CbdadDB1775C525Ca6FcF18ec4135D228B#keys-1',
      type: 'EcdsaSecp256k1RecoveryMethod2020',
      controller: 'did:peaq:0x1f7701CbdadDB1775C525Ca6FcF18ec4135D228B',
      publicKeyMultibase: '0x1f7701CbdadDB1775C525Ca6FcF18ec4135D228B'
    }
  ],
  signature: {
    type: 'EcdsaSecp256k1RecoveryMethod2020',
    issuer: '0x9Eeab1aCcb1A701aEfAB00F3b8a275a39646641C',
    hash: '0x1d76e12aafe2701545e8f1a2be8854dcd0b209521aaef9d836548dc047650fad1af0fcb5922b125aa431a97be3eaf5d5703e86bed5e3163d59117cd832bb54651b'
  },
  services: [
    {
      id: '#unsignedMessage',
      type: 'peaqStorage',
      data: '392c33b7-aaec-490a-b392-97af8d1e3910'
    },
    {
      id: '#admin',
      type: 'admin',
      data: '0x9Eeab1aCcb1A701aEfAB00F3b8a275a39646641C'
    }
  ],
  authentications: [ 'did:peaq:0x1f7701CbdadDB1775C525Ca6FcF18ec4135D228B#keys-1' ]
}
Explanation of the Returned DID Document
id - The full Decentralized Identifier (DID) of the machine. It is based on the machine’s EVM address.
controller - The entity that controls this DID in this case, the machine itself.
verificationMethods - Defines how the machine proves its identity.
- Indicates that the DID can be authenticated using ECDSA signature generated by the machine’s public key.
- The key provided here (
publicKeyMultibase) is the machine’s wallet address.
signature - Generated by the admin who signs a canonical representation of the machine’s stored data.
- type -
EcdsaSecp256k1RecoveryMethod2020 (the algorithm used for signature verification).
- issuer - field identifies the admin wallet that signed the message.
- hash - is the raw signature value (a string of bytes representing the signed message).
A verifier can use this field in combination with the unsigned message in peaq storage to confirm that the message was indeed signed by the admin & machine (see below).
services - Links the DID Document to external data and related parties.
- unsignedMessage - points to the key used in peaq storage for admin and machine wallets where the original (unsigned) message is stored.
- #admin - links to the wallet that administer’s or manages this machine (set during DID creation).
authentications - Specifies the verification method to be used for authenticating the DID.
- This field references
#keys-1 from the verificationMethods section, meaning that the machine’s public key is used to authenticate operations associated with the DID.
Verify Storage
In this step, we verify that the machine-generated data in peaq storage is authentic and has been approved by the trusted administrator. Using the resolved DID Document, we will:
- Retrieve the unsigned admin approval data from peaq storage using the stored UUID.
- Confirm that the stored approval object correctly references the storage key.
- Retrieve the unsigned machine data using the machine’s public key.
- Verify the machine’s signature—embedded within the admin-approved content—by recovering the machine’s public key from the unsigned machine data.
- Verify the admin’s signature on the canonical approval data, ensuring that the trusted authority indeed approved the machine data.
The following code demonstrates these steps using ECDSA signature verification via the ethers library:
import { Wallet, ethers } from "ethers";
import { Sdk } from "@peaq-network/sdk";

// Reuse the ECDSAKeyring class from previous page
class ECDSAKeyring {
    constructor(privateKey) {
      if (privateKey) {
        this.wallet = new Wallet(privateKey);
      } else {
        this.wallet = Wallet.createRandom(); // generates new key
      }
    }

    getAddress() {
      return this.wallet.address;
    }

    getPrivateKey() {
      return this.wallet.privateKey;
    }
    async signMessage(message) {
      return this.wallet.signMessage(message);
    }
}


async function readDID(machineWallet){
  const HTTPS_BASE_URL = "https://peaq-agung.api.onfinality.io/public"; // Agung testnet endpoint
  const WSS_BASE_URL = "wss://wss-async.agung.peaq.network";        // Used to read previously stored DID

  const name = "project_name"; // Same name as before

  const sdk = await Sdk.createInstance({
      baseUrl: HTTPS_BASE_URL,
      chainType: Sdk.ChainType.EVM
  });

  const document = await sdk.did.read({
    name: name,
    address: machineWallet.getAddress(),
    wssBaseUrl: WSS_BASE_URL
  });

  return document.document;
}

async function readStorage(uuid, issuer){
  const HTTPS_BASE_URL = "https://peaq-agung.api.onfinality.io/public"; // Agung testnet endpoint
  const WSS_BASE_URL = "wss://wss-async.agung.peaq.network";        // Used to read previously stored DID

  const sdk = await Sdk.createInstance({
      baseUrl: HTTPS_BASE_URL,
      chainType: Sdk.ChainType.EVM
  });

  const key = "my_key";
  const pair = await sdk.storage.getItem({
      itemType: uuid,
      address: issuer,
      wssBaseUrl: WSS_BASE_URL
  });
  return pair[uuid];
}


async function main(){
	// Get previously created wallet via the private key
    const machineWallet = new ECDSAKeyring(MACHINE_PRIVATE);

    // Same data value that was stored previously
    const doc = await readDID(machineWallet);

    // Get public keys for admin and machine
    const machinePublicKey = doc.verificationMethods[0].publicKeyMultibase;
    const adminPublicKey = doc.signature.issuer;

    // Get signature for the admin approved message
    const adminSignature = doc.signature.hash;

    // Get uuid to read from the storages
    const uuid = doc.services[0].data;

    // Read peaq storage to get the unsigned admin message
    const unsignedAdminMessage = await readStorage(uuid, adminPublicKey);

    // Make sure the unsigned admin data is relevant to the DID context
    const adminSignedObject = JSON.parse(unsignedAdminMessage);
    if (adminSignedObject.storageKey != uuid){
      throw new Error("UUIDs do not match");
    };

    // Get unsigned machine data
    const unsignedMachineMessage = await readStorage(uuid, machinePublicKey);

    // Verify machine data
    const recoveredAddress = ethers.verifyMessage(unsignedMachineMessage, adminSignedObject.machineSignature);
    console.log("Machine Signature valid:", machinePublicKey === recoveredAddress);

    // Verify admin
    const recoveredAddress2 = ethers.verifyMessage(unsignedAdminMessage, adminSignature);
    console.log("Admin Signature valid:", adminPublicKey === recoveredAddress2);
}

main();
Machine Signature valid: true
Admin Signature valid: true
- Machine Verification:
The unsigned machine data stored in peaq storage was indeed signed by the machine (as the recovered address matches the machine’s public key).
- Admin Verification:
The admin-approved content was signed by the trusted administrator (as the recovered address matches the admin’s public key).
🎉 Congratulations! You’ve successfully validated that the machine-generated data is both authored by the machine and approved by a trusted admin. This dual-layer signature verification ensures decentralized trust and accountability in your DePIN system.
Block Explorers
To gain deeper insight into your machine’s activity on the network, you can use a block explorer. Block explorers allow you to view all on-chain transactions associated with your wallet, track DID and storage interactions, and confirm whether data was successfully recorded.
Depending on the network you’re using, visit the appropriate Subscan explorer:
In this guide, we’ll focus on the agung testnet explorer.
Viewing Your Wallet
To begin, copy the public address of your machine wallet — the same one that executed your DID and storage transactions. For example:
0x1f7701CbdadDB1775C525Ca6FcF18ec4135D228B
Paste this address into the search bar at the top of the agung explorer homepage. You’ll be directed to a detailed page for that wallet address, which looks like this:
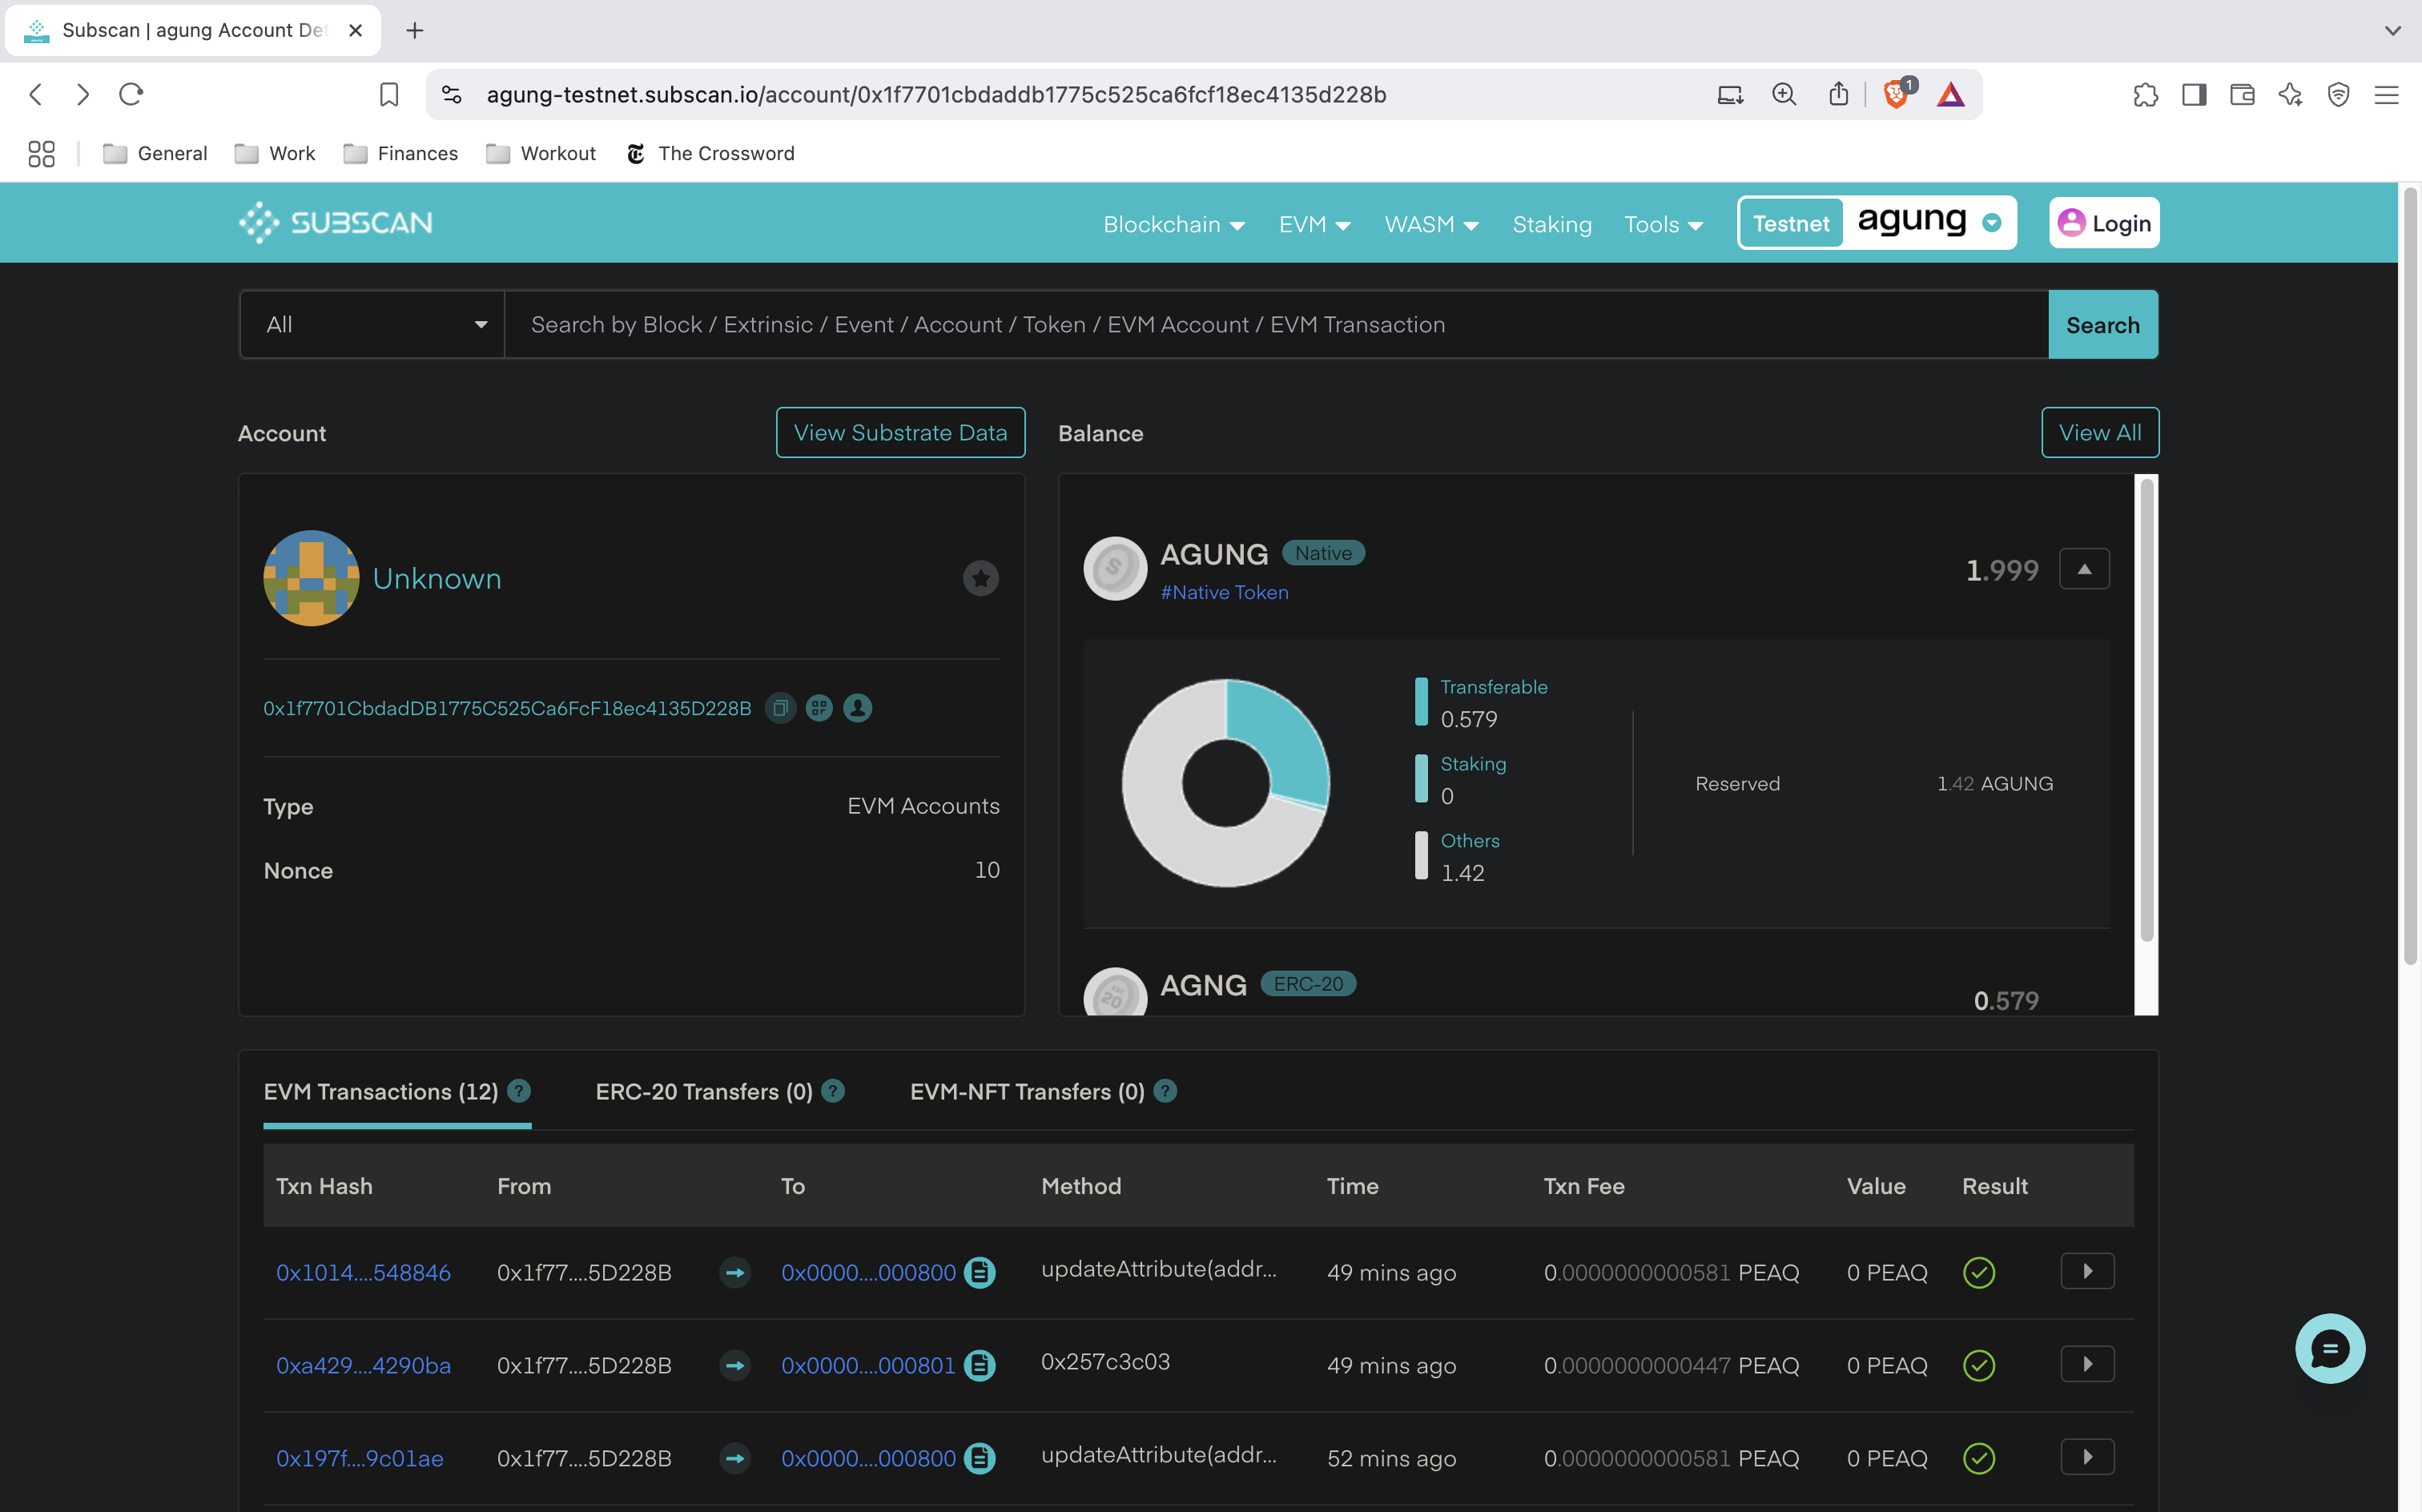
Token Balance Overview
In the top-right section, you’ll see the machine’s $AGUNG token balance. This is the native token used for transaction fees.
In this example:
- The account holds a total of 1.999 AGUNG
- 0.579 AGUNG is currently transferable
The remaining balance is locked as a deposit (or reserved fee), which occurs when interacting with peaq services like creating a DID or storing data.
If needed, you can reclaim these deposits using appropriate “remove” or cleanup functions, depending on your use case.
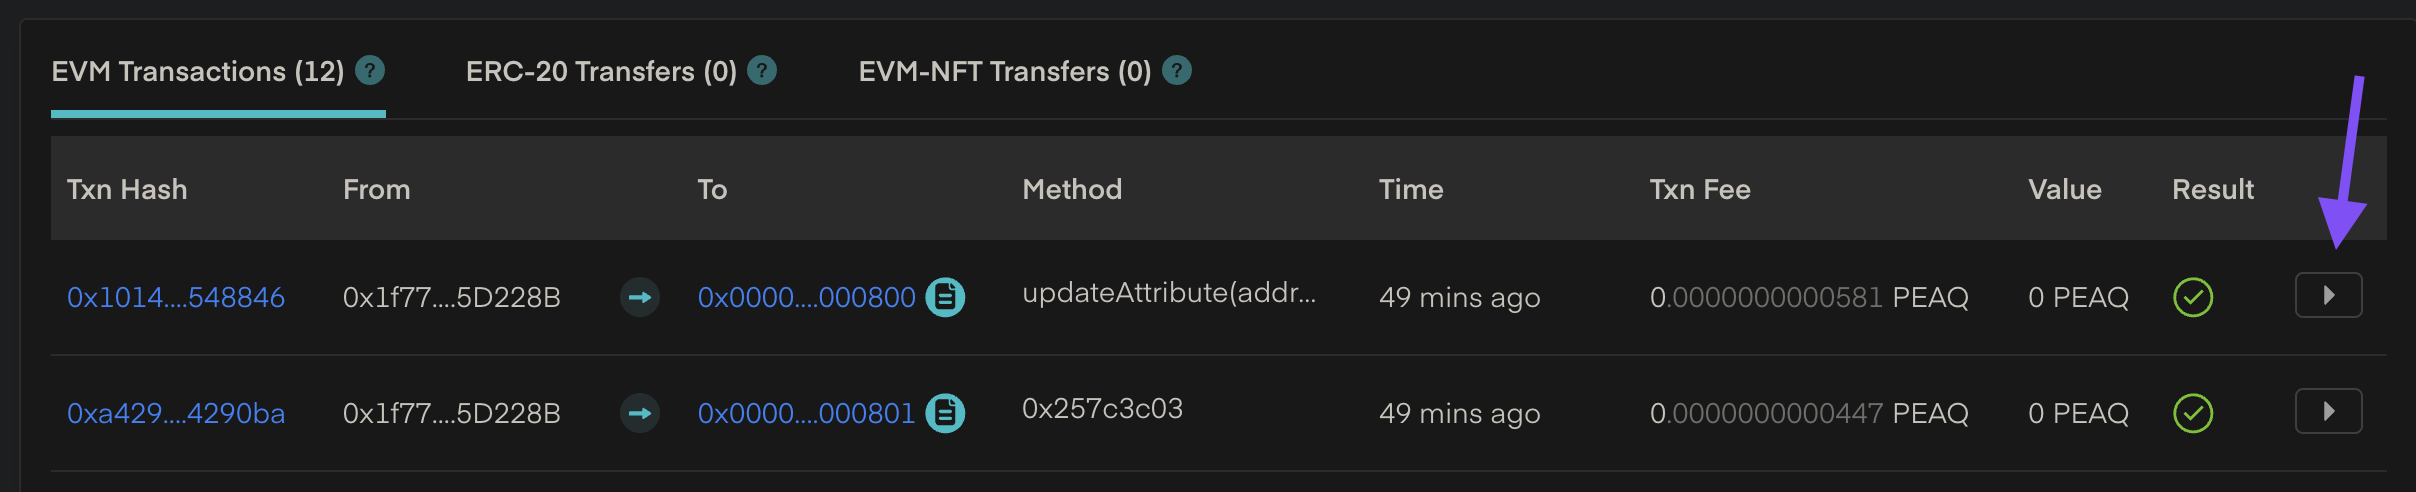
Viewing Transactions
Scroll down to the EVM Transactions section. Here you’ll see a list of all the actions executed by this wallet, such as:
updateAttribute(...) - Used to update the machine’s DID Document.addStorage(...) - Used to store a message in peaq storage.
To view more details about a specific transaction, click the arrow on the far right.
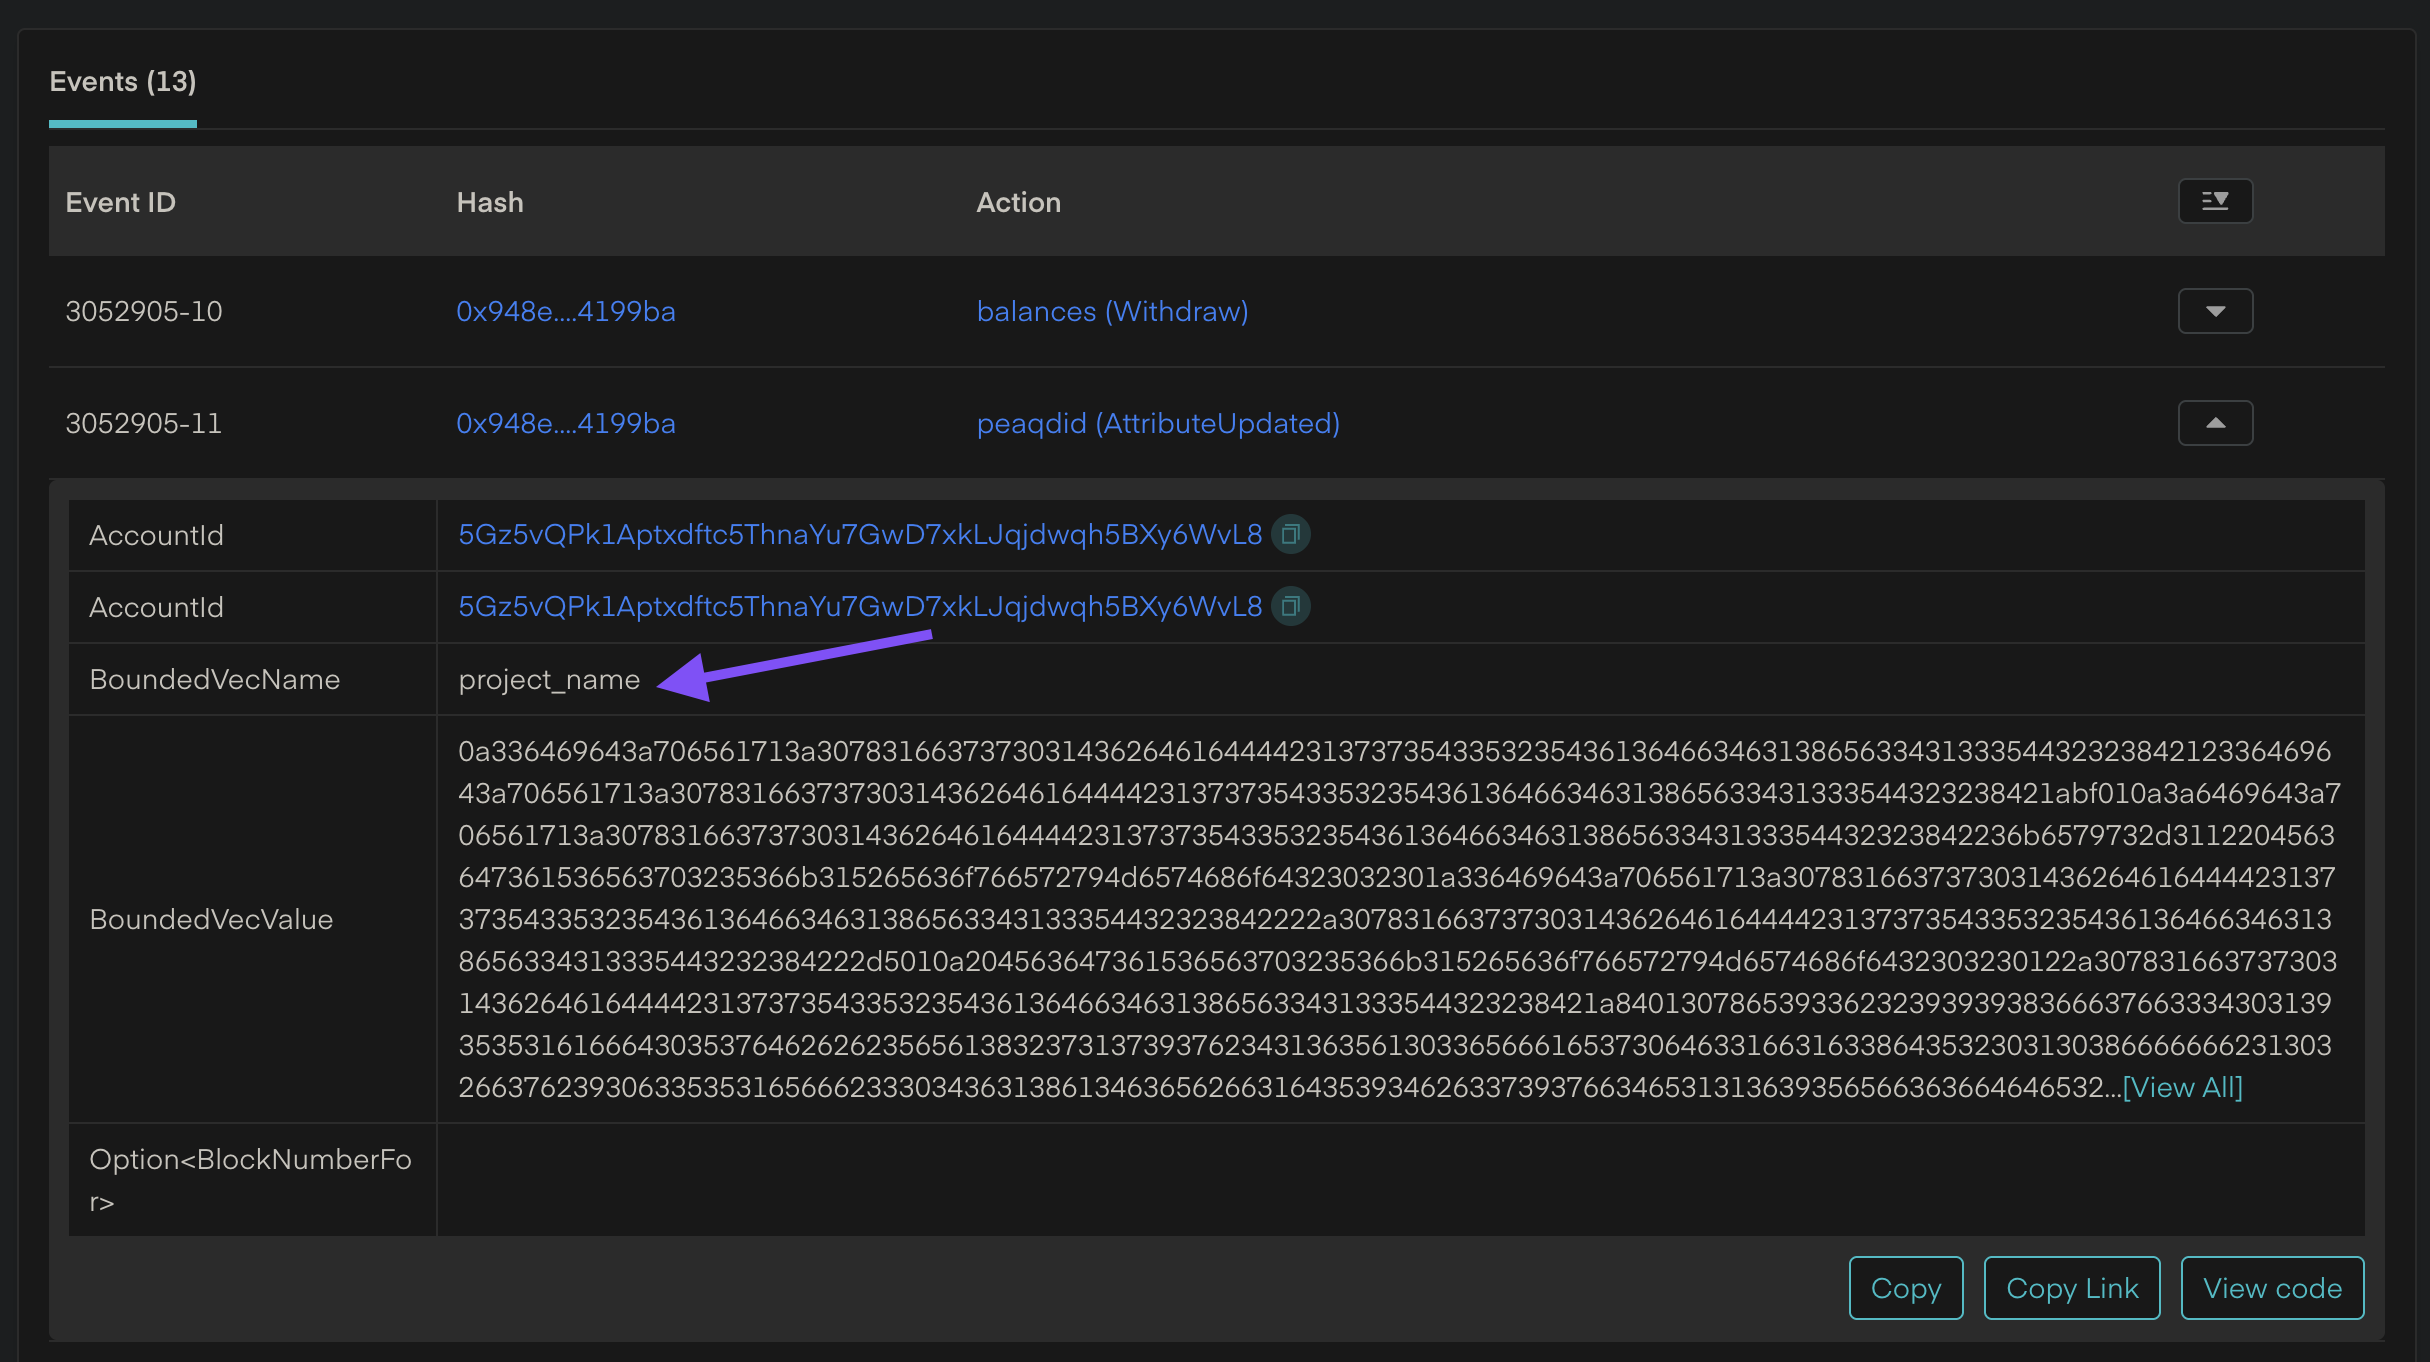
Viewing Transaction Events
Once you click into a transaction, you’ll see a breakdown of on-chain events triggered by the transaction.
In the example below, you can see:
- The extrinsic
peaqdid(AttributeUpdated) was triggered.
- The DID name
project_name was updated.
- The
BoundedVecValue shows the actual value written — a serialized representation of the updated DID Document.
This is especially useful for confirming what data was actually committed to the chain and debugging any mismatches between expected and actual values.
Summary
Block explorers like Subscan are essential tools for:
- Verifying DID and storage transactions.
- Tracking gas usage and deposit balances.
- Debugging incorrect or failed writes.
- Confirming that your machine’s identity and data are verifiably recorded on-chain.
Bookmark your machine’s Subscan URL for quick reference during development and testing. 🛠️