> ## Documentation Index
> Fetch the complete documentation index at: https://docs.peaq.xyz/llms.txt
> Use this file to discover all available pages before exploring further.
# DeFi on peaq
# DEX
Native DEX on peaq is provided by MachineX: [https://www.machinex.xyz/](https://www.machinex.xyz/)
# Guide: DeFi Essentials on peaq
How to access peaq on popular EVM-compatible wallets?
### Add peaq as a custom network on your wallet
Most EVM wallets enable you to add a custom network — make sure to refer to their respective guides, such as:
* [MetaMask](https://support.metamask.io/configure/networks/how-to-add-a-custom-network-rpc/)
* [Rabby Wallet](https://www.quicknode.com/guides/ethereum-development/wallets/how-to-set-a-custom-provider-in-rabby)
* [Trust Wallet](https://trustwallet.com/blog/guides/how-to-add-a-custom-network-on-the-trust-wallet-app)
* [Base App](https://www.quicknode.com/guides/ethereum-development/wallets/how-to-setup-coinbase-wallet-with-quicknode)
### Use the following settings to add peaq:
* RPC Endpoint: [https://quicknode3.peaq.xyz](https://quicknode3.peaq.xyz)
* Chain ID: 3338
* Currency: PEAQ
* Block Explorer URL: [https://peaq.subscan.io](https://peaq.subscan.io)
### You can now access peaq and dApps on peaq with your wallet
For more network configuration information please check out the [connecting to peaq page](/peaqchain/build/getting-started/connecting-to-peaq).
# How to add custom tokens on peaq to my wallet?
Depending on your wallet, sometimes, you may need to manually add specific tokens on peaq to your wallet as custom tokens.
Please see this guide on adding custom tokens from [MetaMask](https://support.metamask.io/manage-crypto/tokens/how-to-display-tokens-in-metamask/) as an example.
To find a token's address on a network, head to CoinMarketCap or CoinGecko, open the page of the token you want to add, and review the list of its Contracts in the menu on the left:
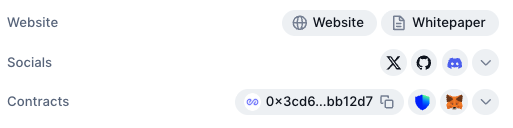 Important Tokens on peaq:
| Block Explorer | Contract Address | Symbol | Decimals |
| ---------------------------- | ---------------------------------------------------------------------------------------------------------------------- | ------- | -------- |
| Bridged stgUSDT (peaq USDT) | [0xf4D9235269a96aaDaFc9aDAe454a0618eBE37949](https://peaq.subscan.io/token/0xf4D9235269a96aaDaFc9aDAe454a0618eBE37949) | USDT | 6 |
| Wrapped Parasail Staked PEAQ | [0xE5330a9fBA99504C534127D39727729899c9a506](https://peaq.subscan.io/token/0xE5330a9fBA99504C534127D39727729899c9a506) | wstPEAQ | 18 |
# How to bridge to peaq?
For the best experience, please use the desktop applications and make sure you have the relevant wallet browser extensions installed and peaq is added as a custom network in your wallet.
Stargate Bridge
Example: Bridging USDT from Arbitrum to peaq with Metamask browser extension
### Step 1
Go to [https://stargate.finance/bridge](https://stargate.finance/bridge) (note: please make sure you have some ETH on Arbitrum One to cover the gas fee for bridging) and connect your wallet.
### Step 2
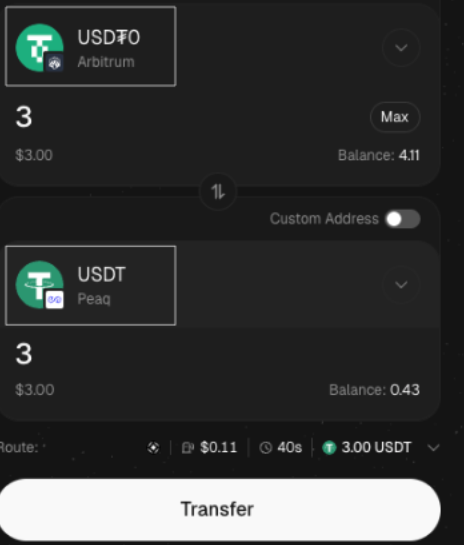
Select the correct token and networks to bridge from and to. In our example, we are bridging 3 USDT from Arbitrum to peaq.
Important Tokens on peaq:
| Block Explorer | Contract Address | Symbol | Decimals |
| ---------------------------- | ---------------------------------------------------------------------------------------------------------------------- | ------- | -------- |
| Bridged stgUSDT (peaq USDT) | [0xf4D9235269a96aaDaFc9aDAe454a0618eBE37949](https://peaq.subscan.io/token/0xf4D9235269a96aaDaFc9aDAe454a0618eBE37949) | USDT | 6 |
| Wrapped Parasail Staked PEAQ | [0xE5330a9fBA99504C534127D39727729899c9a506](https://peaq.subscan.io/token/0xE5330a9fBA99504C534127D39727729899c9a506) | wstPEAQ | 18 |
# How to bridge to peaq?
For the best experience, please use the desktop applications and make sure you have the relevant wallet browser extensions installed and peaq is added as a custom network in your wallet.
Stargate Bridge
Example: Bridging USDT from Arbitrum to peaq with Metamask browser extension
### Step 1
Go to [https://stargate.finance/bridge](https://stargate.finance/bridge) (note: please make sure you have some ETH on Arbitrum One to cover the gas fee for bridging) and connect your wallet.
### Step 2
Select the correct token and networks to bridge from and to. In our example, we are bridging 3 USDT from Arbitrum to peaq.
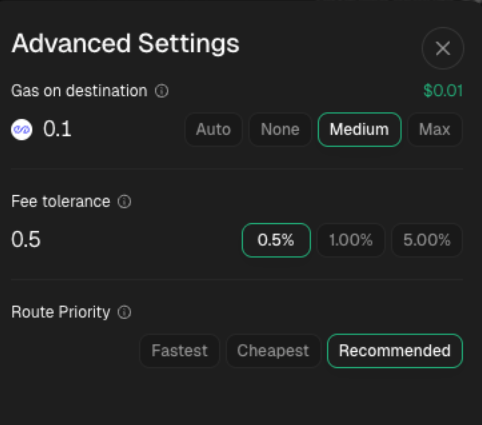
 If it's your first time bridging to peaq, head to `Advanced Settings` and enable `Gas on Destination`. You can choose `Auto`, `Medium`, or `Max` for your gas configuration.
 ### Step 3
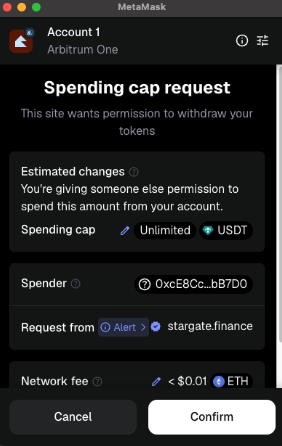
On MetaMask, approve the spending cap request.
### Step 3
On MetaMask, approve the spending cap request.
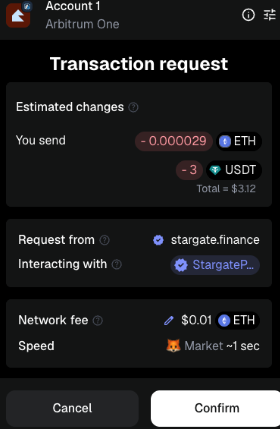
 ### Step 4
On MetaMask, approve the transaction request.
### Step 4
On MetaMask, approve the transaction request.
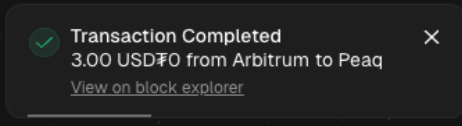
 ### Step 5
Once the transaction is confirmed, a pop-up will show up alongside with a link to the transaction.
### Step 5
Once the transaction is confirmed, a pop-up will show up alongside with a link to the transaction.
 ### Step 6
Wait for LayerZero to complete the bridging (you can monitor the progress on this status bar).
### Step 6
Wait for LayerZero to complete the bridging (you can monitor the progress on this status bar).
 ### Step 7
Bridging complete — you will see the green tick on the interface. You will also find a log of this activity in your MetaMask under the Activity tab on Arbitrum One network.
### Step 7
Bridging complete — you will see the green tick on the interface. You will also find a log of this activity in your MetaMask under the Activity tab on Arbitrum One network.
 ### Step 8
For the bridged USDT balance to show on your MetaMask wallet, find peaq on your wallet's list of custom networks.
Click on **Import Tokens → Custom Tokens**, select **peaq**, and add the following:
* Address: `0xf4D9235269a96aaDaFc9aDAe454a0618eBE37949`
* Symbol: `USDT`
* Decimals: `6` (if you have issues editing the decimal, please update or reinstall your browser extension).
### Step 8
For the bridged USDT balance to show on your MetaMask wallet, find peaq on your wallet's list of custom networks.
Click on **Import Tokens → Custom Tokens**, select **peaq**, and add the following:
* Address: `0xf4D9235269a96aaDaFc9aDAe454a0618eBE37949`
* Symbol: `USDT`
* Decimals: `6` (if you have issues editing the decimal, please update or reinstall your browser extension).
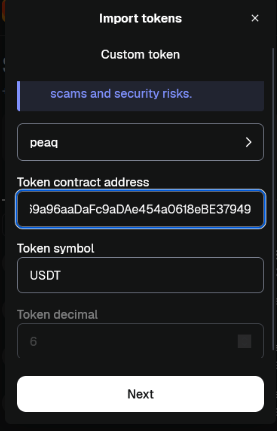 Now your bridged USDT balance on peaq will show up in your wallet!
 **Disclaimer:** The information in this guide is provided for educational purposes only and does not constitute financial, investment, legal, or tax advice. Bridging assets and interacting with blockchain networks and wallets carry risks including loss of funds due to smart-contract bugs, incorrect addresses, network congestion, and fees. Always double-check addresses and network settings, test with a small amount first, and consider consulting a qualified professional. We are not responsible for any loss, damage, or other consequences resulting from your use of this guide or third-party services.